Well, it finally happened. I finally just sat down and wrote the book I've had in my head for over 5 years. The experience (and experiences) that made up it's content has been accumulating for over 30 years though. Between field experience in my youth, practical experience as I've been "practicing", and application experience the entire time, there is quite a bit of information here.
I've included explanations as well as some details to show why and how it can be done. I've been told it is very good and a very easy read, suitable for everyone from the "do-it-yourselfer" to the experienced builder. I am in the process of writing another one based purely on true stories of experiences during my 30 plus years of experience. There are many stories that can be told of which some are serious, some are funny, and some are hysterical to the point of the reader wondering if something like that can really happen. While public speaking on this topic, I remember a number of times mentioning how I should write a book on experiences...as a learning tool. Part of the reason is based on how successful (I've been told many times) these stories were to helping people remember what to do...and what not to do, when it came to decisions made during design and construction. You can tell someone to make sure they use "reduced expanding foam" around doors and windows many times, but when I told them a story of what happened when someone didn't, well, they will never forget.
The book is called "Guidelines for Design and Construction of Energy Efficient Homes" and is available for the NOOK and the KINDLE. One of the nice things about these two options is they both have free downloads for reading your eBooks on your computer. So if you don't have a "hand eBook reader" yet, or don't plan on getting one, you can still read it on your computer by just downloading the free KINDLE or NOOK reader for your computer. You can also download the first 10% as a free sample to see if you like it. Really cool.
My third book, will be my Catalog of Plans. This has also been started, and accumulating for over 30 years, but it will finally be put out for publication within this month.
Wednesday, April 27, 2011
Friday, July 9, 2010
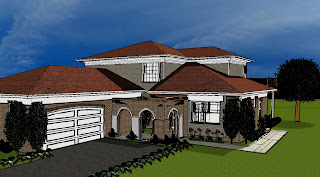
Add 3D Full Color Renderings to your Sales & Presentation Packages
Add full color 3D renderings to your presentations.
 Renderings can look like charcoal, pen & ink, watercolor or photographic. See what the same view would look like using more than one media and chose the one that's best for you.
Change materials, colors and design and have these changes shown at little or no extra charge.
Put the house right on the site using the topography provided or a background image you provide. The more information you provide, the more detailed and exact the options that can be provided in the renderings. See Portfolio page for samples.
Provide your clients with a better idea of what the house will look like.
How frustrating is it to present a great design to your client only to have them not be able to "visualize" your concept seeing only the floor plan and elevations? As a developer, how much easier would it be to sell a home if you could show each option, in color, on each model house? These are only a couple of reasons I have found this technique a tool of full color renderings to be one of the best methods to get the design ideas across to my clients over the years.

What do you need to to provide?

What would the house look like at night?

...turns into night. Adjust the light selection and location to get better overall lighting effects. Add lights in areas where more security might be needed. Or, just provide something really cool that might put the client "over the top" in love with the design. Presentation means so much...both before and after the contract is made with the client.
...and the Cost?

What can do interiors as well.If you want interiors done we can provide those as well. The detailing is usually more involved so the cost is usually a little more, but you can request a package of interiors for a room and gain the same cost efficiency as mentioned above with respect to an exterior package. Interiors are done on a room by room basis. Since some rooms require other rooms in the background to be detailed, this may increase the cost for that series, but if that room in the background is to be part of another series request for that room, then there would be no cost increase due to the background.


 For more information you can contact Joe at joe@conceptsindesigns.com

Change materials, colors and design and have these changes shown at little or no extra charge.
Put the house right on the site using the topography provided or a background image you provide. The more information you provide, the more detailed and exact the options that can be provided in the renderings. See Portfolio page for samples.
Provide your clients with a better idea of what the house will look like.
How frustrating is it to present a great design to your client only to have them not be able to "visualize" your concept seeing only the floor plan and elevations? As a developer, how much easier would it be to sell a home if you could show each option, in color, on each model house? These are only a couple of reasons I have found this technique a tool of full color renderings to be one of the best methods to get the design ideas across to my clients over the years.

What do you need to to provide?
All that is needed is an accurate dimensioned floor plan and elevations that I use to build the base that I use to generate these high quality renderings. If you want the house placed on the actual site, as apposed to a generic "flat" site, I would need the site plan/topography with trees as needed as well...with the house located on the site.

If you are using this tool for your development, and you want to show all the material and design options, I would need those as well. These can be in the form of any graphic file type (including samples from a supplier). The more details you provide, the more details we can show. As an example, changing from brick to siding on an elevation is a simple change. I bet you never thought you'd hear someone say that before.
What would the house look like at night?

I'm sure you've seen what a view might look like during the day...but what about at night? How many times has a client said, "I bet this would look great at night with the landscape all lit up". I wonder what it would look like. Just edit the time of day, the sun angle changes, and what you see during the day...

...and the Cost?
This is based on what is provided and what output you need. The more information you can provide makes it easier for us to generate the end product. The more options you need, the more work is needed...but, this doesn't mean a big cost extra...or any at all, depending on the package. One drawing vs. a series or package of drawings will also vary the cost. We can generate a series of renderings using the exact same information as we would have used to generate just one rendering. We just change the viewing angle and generate the new rendering.

What can do interiors as well.


 For more information you can contact Joe at joe@conceptsindesigns.com
Tuesday, April 13, 2010
Why Energy Efficiency is cost effective
True Energy Efficiency is very cost effective if the solutions are based on substitutions of materials and systems rather than simply adding on materials or expensive systems because the manufacturer says they are energy efficient in nature. True energy efficiency is really more dependent on the construction details as well as treating the house as a "System" rather than individual parts.
Too many times I have seen houses designed and built with energy efficiency in mind and the end product, and the decisions that it is based on, just becomes too expensive to build. When energy efficient decisions are made they are usually made based on treating the symptoms instead of the core problems. A Doctor would never do that, so why do it here? A few great examples that I avoid is simply adding more insulation, adding housewrap, and installing a higher efficiency furnace. If these are the decisions that are made in the name of energy efficiency, all that happens is increasing the cost to build while while reducing the energy cost by a minimum. These decisions are "bandaid" approaches to permanent problems. They don't work.
The key is to treat the house as a system of systems and individual parts that make up that system. In other words, don't make your decisions of which insulation product to use based on the different costs of the products. Make that decision based on the effect that product has on the rest of the house. I always use blown in insulation for this reason. If I can get the same R-Factor in a 2 x 4 wall with a blown insulation product as I can get in a 2 x 6 wall with a roll of fiberglass, even if the blown in product costs more, this is the most cost effective decision to make. Why? Simple, the added cost of the blown in product is offset by the savings of not going with the 2 x 6 construction. No, it's not the framing cost difference that saves you money, it's the lack of having to add extension jambs on all you windows that does it. What is important about this, is the blown in product is a much better product than the roll because of the tightness of the fit. This decision of product is a better choice because the installation is much better, and that will contribute allot more to energy efficiency than a higher R-Factor. You can't possibly install a roll of insulation as well as you can a blown or sprayed in product.
Your HVAC decisions are important for more than just the heating/cooling unit chosen. That unit is only as efficient as the rest of the system...like the design and placement of the ductwork...especially the sizing of the cold air returns. Also, you can't size the unit based on the square footage of the house if you have designed and energy efficient house...it will almost always be too big. That will result in spending too much money on the unit and running a very inefficient system wasting allot of money for heating and cooling you don't use.
The housewrap issue is just an example of great marketing. The only time I use it is when I need it behind a brick veneer finish. It's supposed to stop air infiltration...called leaks...but by the time it works (if it did), it would already be out of the house, past the insulation, and no good to me. Besides, the only way to install it is to staple it to the sheathing...meaning you are now putting more holes in it,...and, have you ever talked to any carpenter that liked installing it? It shows. Like I said, it's supposed to stop the air from leaking out or into the house. Since it doesn't work, why not leave it off the material list altogether and substitute with something that does work...like a foam sealant? Why? The foam sealant works. It fills in all the gaps and seams where air passes through and actually helps to turn the wall into a monolithic system as opposed to a series of individual parts. Think of it this way. First, the air/heat passes through the drywall then it avoids the roll of insulation and just leaks through the gaps between the insulation and the studs, then it hits the sheathing, then the houswrap, then the finish. What this means is each component of the wall is acting independently...no team work so to speak. By using the foam sealant in conjunction with the blown/sprayed insulation, you now have a monolithic system where the components work together instead of on their own.
This foam is also used to fill the gaps around every penetration there is on the house. This includes, but not restricted to:
What about those windows? I don't look at the R-factor as much as I look at the air infiltration rate. Not only does this tell you the obvious...that this is an energy efficient window, but it also tells you how good the quality of the window is. It still comes down to the installation as the potential, and usual, weak link here. You can have the most energy efficient window on the planet, but if the installation is poor...meaning there are gaps unfilled between the frame and the rough opening (and "stuffing insulation into it is just as bad as not filling it at all) the air just goes around the window and escapes through the cracks.
The rest is really just framing the house in a way to eliminate the ares of the house that should be insulated...but isn't. Floor bonds, wall corners (actually this method costs less), locations where the interior wall intersects with an exterior wall (this method also cost much less than what we do now), headers and the "heels" at the cornice/soffit area. All of these areas are areas where there is either little or no insulation, but the construction methods that are substituted allow us to insulate these areas fully...while the cost is far less.
Here in Michigan, as part of the seminar I spoke at, our local electrical utility company did a year (December 1993 to December 1994) long study on one of my houses to see the effects of what I described above was on the energy bills. The house in question was a 4800 sq ft house with walkout basement using the above methods to build. The cost to build this house was actually less than if we hadn't done the "energy substitution" decisions above. The energy cost...?, how about an average of only $30/month. Keep in mind this included a time in January 1994 when for a couple of days the actual recorded temperatures was in the forty degrees below Fahrenheit range...you read that correctly. It was a time of record lows in the state.
Treat the house as a system when it is designed, with no weak links, and you'll end up a winner...now and into the future.
This foam is also used to fill the gaps around every penetration there is on the house. This includes, but not restricted to:
- plumbing stacks
- sill plates
- electrical boxes
- behind trims and moldings
- utility feeds
- headers...and more
What about those windows? I don't look at the R-factor as much as I look at the air infiltration rate. Not only does this tell you the obvious...that this is an energy efficient window, but it also tells you how good the quality of the window is. It still comes down to the installation as the potential, and usual, weak link here. You can have the most energy efficient window on the planet, but if the installation is poor...meaning there are gaps unfilled between the frame and the rough opening (and "stuffing insulation into it is just as bad as not filling it at all) the air just goes around the window and escapes through the cracks.
The rest is really just framing the house in a way to eliminate the ares of the house that should be insulated...but isn't. Floor bonds, wall corners (actually this method costs less), locations where the interior wall intersects with an exterior wall (this method also cost much less than what we do now), headers and the "heels" at the cornice/soffit area. All of these areas are areas where there is either little or no insulation, but the construction methods that are substituted allow us to insulate these areas fully...while the cost is far less.
Here in Michigan, as part of the seminar I spoke at, our local electrical utility company did a year (December 1993 to December 1994) long study on one of my houses to see the effects of what I described above was on the energy bills. The house in question was a 4800 sq ft house with walkout basement using the above methods to build. The cost to build this house was actually less than if we hadn't done the "energy substitution" decisions above. The energy cost...?, how about an average of only $30/month. Keep in mind this included a time in January 1994 when for a couple of days the actual recorded temperatures was in the forty degrees below Fahrenheit range...you read that correctly. It was a time of record lows in the state.
Treat the house as a system when it is designed, with no weak links, and you'll end up a winner...now and into the future.
Tuesday, January 19, 2010
Modular Home Construction. The Best Home Money Can Buy.
What is a Modular Home? It's probably not what you think. Modular homes can give you one of the most energy efficient, cost effective, high quality built homes ever...and they can be custom designed. It's surprises me that in this day and age, how many people still think of a Modular home as just another "mobile home". Not close. Modular homes are not the same thing as "Manufactured" homes. Modular homes are exactly the same construction as a typical "stick built" home...just built in a factory. The factory means you have less waste, better quality controls, lower labor costs since all the labor comes to the same place for every house, and incredible energy efficiency

Custom Plans from the Factory
As I stated above, you can have the factory build it from a custom plan too. It can also be a great way to build a development. Scheduling is not an issue since all the "open" construction is done in the factory. The speed factor plays a big role here too. Order the plan, pick the elevation, send in the order and wait for it to be delivered to the site. When it is delivered you just need to do the connections and install the hookups. No more listening to your buyers complain about not having their house built yet, and you having to explain how the weather is affecting construction. How about the positive impact on sales from the energy efficiency.

 Size is Not an Issue
Size is not an obstacle either. I have designed them as small as 900 square feet and as large as 6000 sq. ft. Financing is not a problem either. Most manufacturers have a financing source ready and willing.
Still not sure? Go visit a factory. Every manufacturer will allow you.. check that, will expect you to visit the factory to see the process in action. Many will even let you watch your own home being built.
Check it out. I know you won't be sorry. Just make sure you check out the manufacturers work before you have them build your homes.


Custom Plans from the Factory
As I stated above, you can have the factory build it from a custom plan too. It can also be a great way to build a development. Scheduling is not an issue since all the "open" construction is done in the factory. The speed factor plays a big role here too. Order the plan, pick the elevation, send in the order and wait for it to be delivered to the site. When it is delivered you just need to do the connections and install the hookups. No more listening to your buyers complain about not having their house built yet, and you having to explain how the weather is affecting construction. How about the positive impact on sales from the energy efficiency.


Size is not an obstacle either. I have designed them as small as 900 square feet and as large as 6000 sq. ft. Financing is not a problem either. Most manufacturers have a financing source ready and willing.
Quality Controls in Place
Modular homes are highly engineered and all of the typical "rough" inspections are done in the factory. In fact, these homes are built to meet or exceed local building codes.Still not sure? Go visit a factory. Every manufacturer will allow you.. check that, will expect you to visit the factory to see the process in action. Many will even let you watch your own home being built.
Check it out. I know you won't be sorry. Just make sure you check out the manufacturers work before you have them build your homes.
Saturday, January 9, 2010
What is the Best Energy Efficient System to Use?
Every time I'm speaking on the topic of energy efficient home design, and I begin presenting some of the different options of systems (SIP's, ICF's, Geothermal, Wood Basements, etc...) I get this question...and I give the same answer.
Set Your Priorities
It depends on your priority. Let me explain. First you need to decide if your number one priority is the design layout/function or if it is the implementation of a specific system. In other words, did you fall in love with the layout or the system (SIP's, ICF's, etc...) first. Either way it works fine, but each starting point will take you through a slightly different route.
If you start with the design, then you can pick the best system that maximizes the efficiency and cost effectiveness of the overall design. Pick the system that works best. Each system has certain features/characteristics that may work well with one design, but no so well with another.
If you start with the system, then you design your home with the idea of maximizing the efficiency and cost effectiveness of that system. Again, each system has certain features/characteristics that may lend itself to one design direction instead of another.
Either way works, it just depends on your priorities.
Location and costs
Keep in mind that with all of these systems, you will find that different areas of the country will also have an effect on the energy efficiency and cost effectiveness of that system. One of the factors may come down to cost of delivery of the system itself and the labor costs that will be influenced by the ability to find installers familiar with the system. If you get a price, no matter how good you may think it is, if the contractor doesn't have experience with the installation of that system, beware. You can guarantee that price will go up as the contractor uses your project as their learning tool. If this is your option...don't do it.
Ultimately you will pick a system, using any of the ones listed and more, based on how it works within the overall design/cost of the home. Do your homework and you will be much further ahead when you start your project...and most importantly, you will be in control.
In any case, using an energy efficient system will give you a much better end product. You will be living in a much more energy efficient, and green home, that you will be proud of for a long time.
For more information on some of these systems you can visit my website at:
http://www.conceptsindesigns.com
"It Depends"
Set Your Priorities
It depends on your priority. Let me explain. First you need to decide if your number one priority is the design layout/function or if it is the implementation of a specific system. In other words, did you fall in love with the layout or the system (SIP's, ICF's, etc...) first. Either way it works fine, but each starting point will take you through a slightly different route.
If you start with the design, then you can pick the best system that maximizes the efficiency and cost effectiveness of the overall design. Pick the system that works best. Each system has certain features/characteristics that may work well with one design, but no so well with another.
If you start with the system, then you design your home with the idea of maximizing the efficiency and cost effectiveness of that system. Again, each system has certain features/characteristics that may lend itself to one design direction instead of another.
Either way works, it just depends on your priorities.
Location and costs
Keep in mind that with all of these systems, you will find that different areas of the country will also have an effect on the energy efficiency and cost effectiveness of that system. One of the factors may come down to cost of delivery of the system itself and the labor costs that will be influenced by the ability to find installers familiar with the system. If you get a price, no matter how good you may think it is, if the contractor doesn't have experience with the installation of that system, beware. You can guarantee that price will go up as the contractor uses your project as their learning tool. If this is your option...don't do it.
Ultimately you will pick a system, using any of the ones listed and more, based on how it works within the overall design/cost of the home. Do your homework and you will be much further ahead when you start your project...and most importantly, you will be in control.
In any case, using an energy efficient system will give you a much better end product. You will be living in a much more energy efficient, and green home, that you will be proud of for a long time.
For more information on some of these systems you can visit my website at:
http://www.conceptsindesigns.com
Wednesday, January 6, 2010
The Design Process
Of all the topics I have spoken on as a Featured Speaker, one of the ones that I enjoy the most is the topic of the Design Process. I think one of the reasons for this has been what I feel is a gross misunderstanding of what that process really is...or maybe the misunderstanding is that it is actually a process to begin with. In any case, one of the biggest problems I see when using this process is...not using this process. To understand what I mean you must first understand what the drawing process is...and what it is not.
What are the drawings?...really?
The drawings are not just a piece of paper that is used to reflect what the final product will look like, and how it will be built. The drawings are actually a summary of where the project is at the time the drawings were generated. A summary of the design process at that time. The design process is a series of decisions that need to be made, some before others, and the drawings therefor are simply a reflection of the timetable of those decisions.
The biggest mistake I see in projects is always the same. Clients/designers want to finish the drawings, then research additional input that ultimately will change the design. Why?
There are basically three things that go into each decision:
- What does it look like (aesthetics)
- How does it work (function)
- How much does it cost (reality)
...and the last one carries the most weight. It doesn't matter what it looks like, or if it works, if you can't afford it, don't design it...it will NEVER get built.
So to that end, I present my version of the Design Process that I have used of over 30 years. It has eliminated a number of "unrealized projects" over the years. There are many famous designers/architects that have books of unrealized projects.
Definition: Unrealized Project - A project where someone didn't realize there was a budget involved. (Sounds like a government project...doesn't it).
The Design Process
- Site acquisition. You can find your site later, but it will cost you.
- Preliminary construction/end financing loan qualification. Why design something to find out later you can't get the financing for it. This is a divorce waiting to happen.
- Starting Point. Basic floorplan and exterior style or features. This can come from many different sources, all at one time, and combined during the process. Check out my Catalog of Plan Page for a starting point.
- Layout Preliminary Floorplans. Take your starting point and develop your flow and function. We haven't gone outside (exterior/elevations) yet, but you want to keep in mind what the effects your floorplans will have on the elevations at all times. It's just easier to adjust the exterior to the interior than the other way around. You can start outside, but it will cost you.
- Make changes. This is a common step to the process. You will be making changes all the time. It is much cheaper on paper than while under construction.
- Gain pricing from floorplans. You can get pricing as you go on some of the items that have the widest range of prices at this time such as kitchens, baths, floors, pre-fab fireplaces, appliances, fixtures (plumbing and electrical), and more. It is critical that you do this now.
- Make changes to the floorplans...again. Notice a trend?
- Generate Preliminary Elevations and Sections. You know when to start this step based on a build up of questions during the floorplan steps that can't be answered without seeing the elevations and/or sections.
- Make Changes. Now you will have the elevations and floorplans to make changes to also...along with any more changes that need to be made to the floorplans.
- Price the rest of the job...complete. This will be a price range based on the options you have chosen. Price a high and low end for everything (maybe even some in between), and mix and match combinations until you find the combination of looks/function/price that works best.
"How are you doing so far with that budget from step #2"? - Make changes. Based on the bids you are getting and maybe even new ideas you come across while getting these bids, you may be making more changes..
- Specifications. Begin to compile your specifications for all of your finishes to include how much, who, where and when for each product and/or service.
- Decide on the construction techniques you will be using. By now you will have come across a number of different ways to build this house ranging from stick build to SIP's, Wood Basements, ICF's, Geothermal and more. Make decisions.
- Gain additional pricing if needed. Your budget may not be working out right with the decisions you made. Find more options either in products or better pricing to make it all come together.
- Make drawing changes as needed. Remember, the drawings are just a summary of where you are at the time in your decision making process. Get the drawings up to date.
- Repeat steps #10 - 15. Keep changing your mind now...it costs you so much more in the field, and if you wanted to make a change now but don't, chances are your will make it in the field. Don't do that.
- Total up the bids - verify everything.
- Now - complete the final plans. Now you have made the final decisions, thus the plans (final plans now) will reflect that.
- Schedule project. Contractors & suppliers need to be lined up, verified and scheduled.
- Compile blank forms. Have ready all the forms you will need during construction such as waivers of lien, sworn statements, etc...
- Apply for permits. You can't build it until the building department says OK.
- Make changes. The Building Department is now involved. All I can say is Building Departments have taught me that a dozen eggs does not equal 12.
- Gain Permits. Now the Building Department says OK.
- Make your prints. Contractors need a fresh set since the ones you gave them to make bids off of is either lost or messed up from the bid process.
- Invest in a Pharmacy. Pain reliever and antacids are your best friends.
- Put a shovel in the ground. Start your engines and enjoy. If you are very thorough in the design process, you should eliminate most of your problems and have a less stressful construction phase.
I describe the Design Process as really nothing more than another form of Construction...but on paper...where is is easier and much cheaper.
So enjoy the process and good luck with your project.
Joe Villeneuve, President
Concepts in Designs, LLC
www.conceptsindesigns.com
joe@conceptsindesigns.com
Subscribe to:
Comments (Atom)